Ceci est une ancienne révision du document !
Table des matières
Presentation of the ARRM software interface
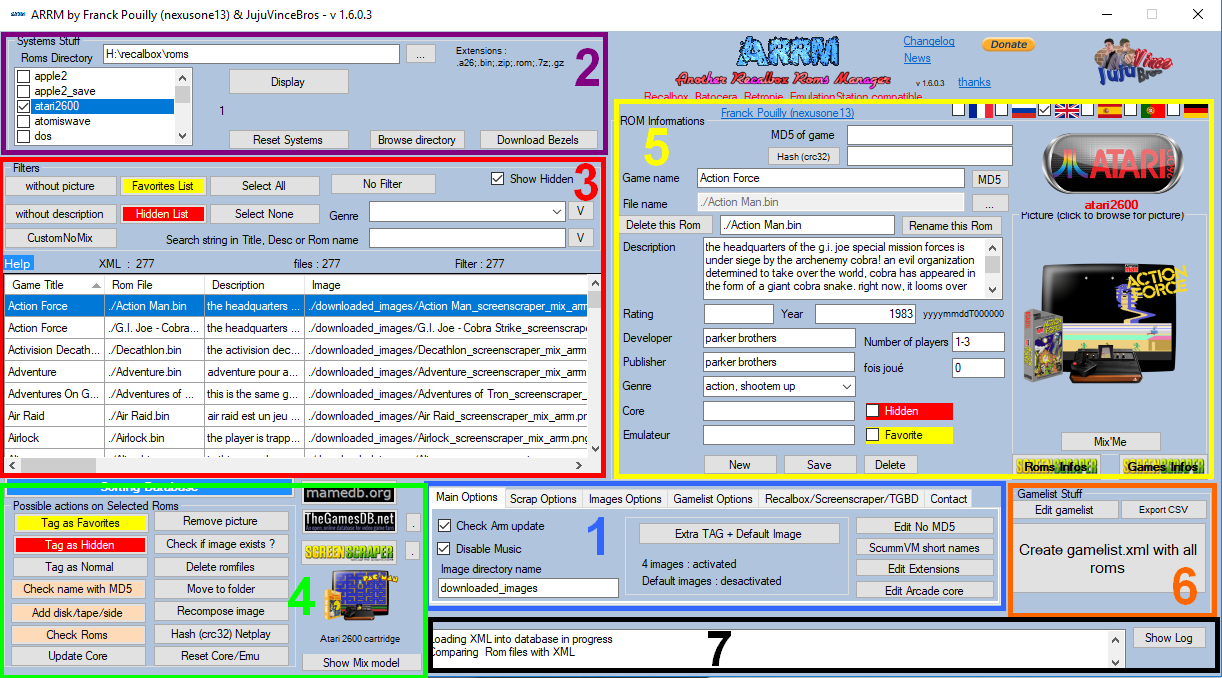
We will detail here the 7 panels that make up the ARRM interface
Software configuration (1)
Please refer to the previous chapter which details all tabs of the ARRM configuration panel.
System selection (2)
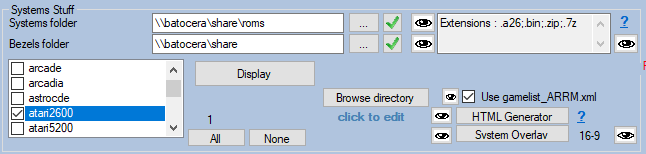
- Roms Folder : Enter here the path to the ROM directories (network or local). Example:
- \\recalbox\share\roms (if you access Recalbox via your network)
- E:\recalbox\share\roms (if you access the memory card / disk of your recalbox connected to your PC
- Directory of overlays (textbox): Specify here the path to the root directory that will contain the overlays. :
- For Batocera: \\batocera\share
- For Recalbox: \\recalbox\share
- For Retropie: \\retropie.
For Batocera, Recalbox and Retropie you can also specify another temporary directory that will receive the overlays generated, but in this case you will need to copy / paste this content on your Box.
- With Recalbox the generated directories will be ' overlays ' and ' system ' to be copied in '\\recalbox\share '
- With Batocera the generated directory will be ' decorations ' to copy in ' \\batocera\share '
- With Retropie the generated directory will be ' configs ' to copy in '/opt/retropie ' on your Retropie
Remember to click on the 'V' buttons to validate the directories. The ![]() icons open the directory in your file explorer.
icons open the directory in your file explorer.
- Display / Screenscraper : If you select only one system, the 'Display' button appears. If multiple systems are selected, the 'Screenscraper' button appears.
- Display: By clicking this button, ARRM will load the file Gamelist.xml in the database or create it and check the consistency with the Roms in the directory. If Roms are not present in the Gamelist.xml they will be added to the Database. Conversely, if there are no Roms present in the gamelist.xml in the directory, they will not be taken into account in the Database. During this phase, ARRM verifies the existence of the image files present in the gamelist.xml and deletes the reference if the image file does not exist in the directory. Once these processes are completed, the database is displayed.
- Screenscraper: By clicking this button, ARRM will sequentially process each of the systems automatically. It performs the processing of the 'Display' button above and then scrapes automatically on Screenscraper (only), saves the gamelist.xml, and then moves on to the next system.
- Recompose image (button): If multiple systems are selected, the 'Recompose image' button appears. It allows to apply the template to all the roms of the selected systems. The template will be the default if 'Template Auto Association' or 'Auto Template' are not checked; otherwise it will be the template associated with the processed system that will be applied.
- Pad 2 Keyb : By clicking on
 you will be able to create/modify the file . P2k.cfg for the selected system. This file is used to assign keyboard keys to the joypad. Useful for computer emulators that sometimes use keyboard keys in games. See explanations: https://recalbox.gitbook.io/documentation/v/francais/user-avance/configurations/pad-to-keyboard
- All : Select all systems.
- Reset Systems : De-selects all checked systems.
- Browse directory : Open the selected system folder.
- System overlay : Overlays recovery of selected systems, and creation of overlays configuration files. They will be stored in the directory mentioned in Directory of overlays . See the paragraph specifically devoted to the recovery of overlays games and systems. The icon opens the directory where overlays model files are stored.
- Use gamelist ARRM (checkbox): when a gamelist.xml is created by ARRM, ARRM creates a gamelist_ARRM.xml copy. When choosing a system, if the checkbox 'use ARRM gamelist' is checked, ARRM will use this gamelist_ARRM.xml file and not the gamelist.xml file which could have been modified by the frontend. This makes it possible not to lose the custom ARRM tags that may have been deleted by the Frontend. This is useful for someone who regularly comes back to, for example, his gamelist.xml to do 'image recomposing' or other manipulations offered by ARRM. Otherwise it shouldn’t interfere.
- Extensions : displays the list of extensions recognized for this system. Only the files containing these extensions will be displayed in the database. This list is powered by the file % appdata%\roaming\Nexouille soft\arrm\database\systems_extensions.txt which contains the extensions recognized by Recalbox, Batocera AND Retrope. If you want to remove/add extensions, please refer to the files '_lisezmoi.txt/_readme.txt' for Recalbox and '_infos.txt' for Batocera present in each system directory that contains the list of recognized extensions. You can edit this file via the configuration panel, 'General Options' tab, 'Edit Extensions' button. You have to restart ARRM to take effect.
—-
The Database (list of Roms) (3)

This window that I call the Database contains the information that will be written in the gamelist.xml during its backup / creation. Some fields are editable, but it is better to go through the 'Information Rom' panel that applies input controls.
This database is filled when selecting a system. It will contain the info of the gamelist.xml (if it exists) and the files present in the current system directory (if they did not exist in the existing gamelist.xml)
By tapping on a letter on the Database (if sorted in alphabetical order), the index (highlight) will be positioned on the first found game name beginning with that letter.
Undock / Dock (button): allows you to detach the database from the main form and thus be able to move it and resize it. Example with the detached database:
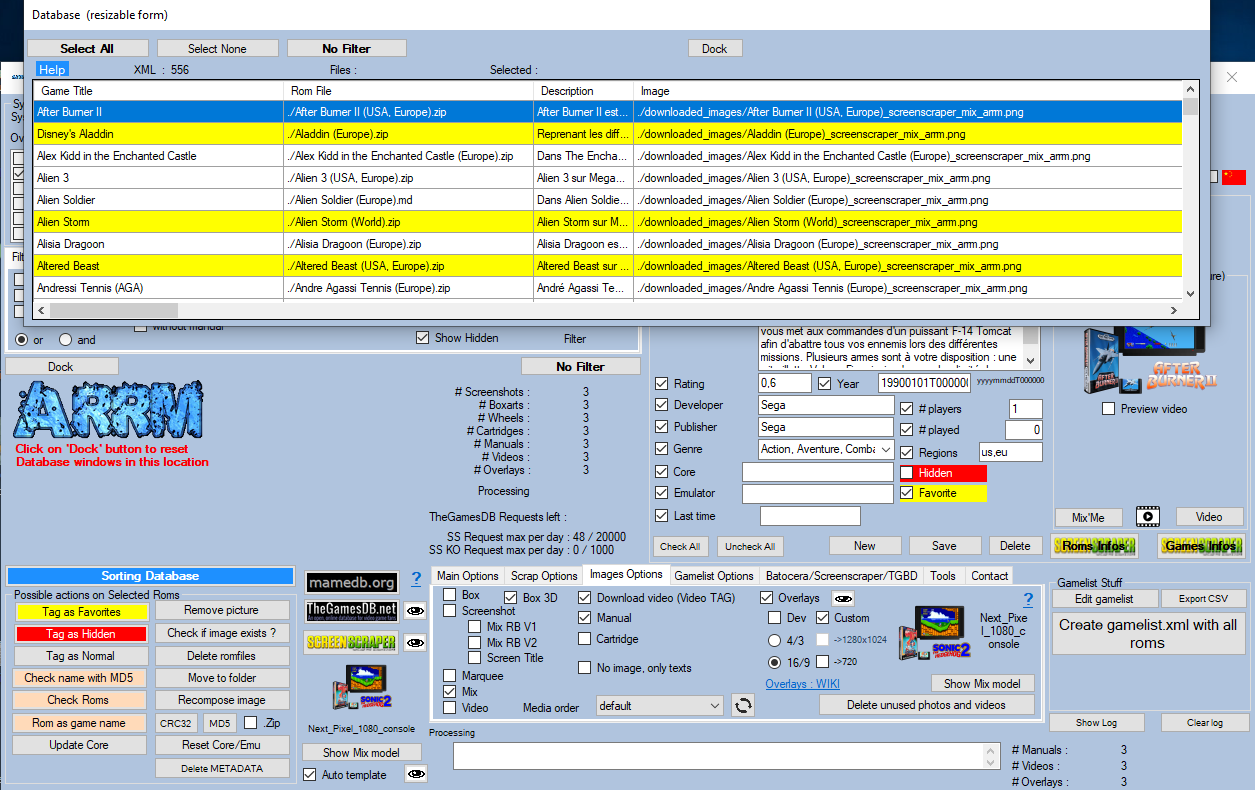
Select all (button): Selects all the elements of the database.
Select none (button): Deselects all the elements of the database.
No filter (button): Removes all filters applied to the database.
On this Database we will be able to apply
- Filters
- Research
- Actions, triggered by various buttons of the panel 'Possible actions on selected Roms' (4)
Filters :
- without picture (button): Filters the Database to display the Roms with empty Picture Tag
- without description (button): Filters the Database to display the Roms with empty description tag
- wWithout video (button): Filters the Database to display the Roms with empty Video Tag
- without screenshot (checkbox): Filters the Database to display the Roms with empty screenshot Tag
- without boxart (checkbox): Filter the Database to display the Roms with empty Boxart tag
- without marquee (checkbox): Filters the Database to display Roms with empty marquee Tag
- Without manual (checkbox): Filters the Database to display the Roms with empty Manual Tag
These filters can be combined with each other by applying the AND / OR operator which will apply to all the conditions checked. The OR operator and most often used. Example:
- With AND : 'Without description' AND 'Without image'
- With OR : 'Without description' OR 'Without video'
- Filter (button): Activates the filters defined above
- Missing Overlays (button) : Selects overlays not found in previous overlays search. Missing overlays are in _missing_overlays_%SYSTEM%.txt file located in subdirectory logs_arrm of the selected system
Note: When you scrape all or part of the roms by requesting the recovery of overlays, the roms whose overlays were not found will be written in the _missing_overlays_%SYSTEM%.txt file located in the logs_arrm directory of the current system. During a next scrap, the previous file will be saved with today's date. example: _missing_overlays_ATARI2600_20191116-1520.txt
- Favorites List (button): Filters the Database to display only the Roms with the Tag Favorites checked
- Hidden List (button): Filters the Database to show only Roms with hidden Tag checked
- Select all (button): Selects all the Roms in the Database
- Select none (button): Do not select any of the Rom from the Database
- No filter (button): Disables all filters applied to the Database
- Show hidden (button): If checked, also show Roms with hidden tag checked. Filter is persistent.
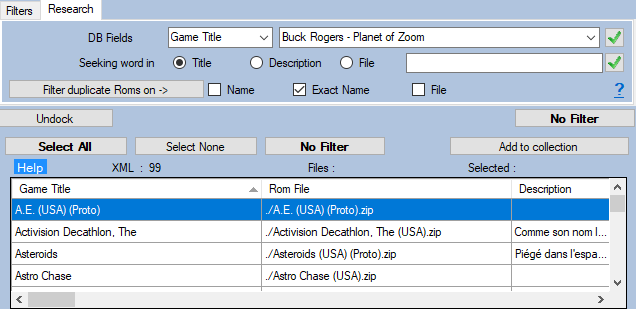
Research :
- Genre (Listbox) (button): Allows to filter the Database on a Genre (among those found in the Roms of the selected system)
- Search string in Title, Desc or name Rom (Listbox): Allows to filter the Database on a chain of character. The search is carried out on the fields Title, Desc or Name file Rom
- Filter duplicated Roms on (button): Allows to search for duplicated Roms according to 3 modes. The searches are done on the names of roms or files expurgated of () and []:
- Name : Searches for Roms containing in the game name a part of a name of another rom. Example: The following game names appear as duplicate game : 'Asterix', 'Asterix And The Great Rescue' and 'Asterix And The Secret Mission'. Charge to you to make your selection.
- Exact Name : Searches for Roms containing in the game name the exact name of another rom. Useful if you have clones (different rom file) but whose game name is the same. Apply once the game was scraped because the game names returned will be accurate. Example: the roms 'Speedball (Europe) (Mirrorsoft).zip' and 'Speedball (Europe) (Virgin).zip' will return the same game name (Speedball)
- File : Searches for the Roms containing in the file name part of the file name of another Rom. Example: 'Back to the Future Part II (Europe).zip' and 'Back to the Future Part III' (Europe).zip
Remember to remove the filter by clicking on 'No filter' after use.
Actions on selected Roms (4)
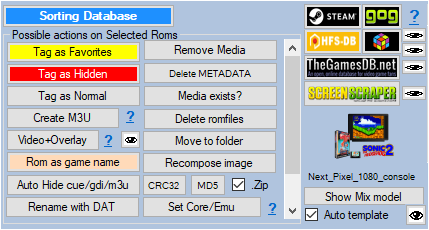
All the actions associated with the buttons in this menu apply to the selected Roms (highlighted) in the Database
- Tag as Favorites (button): Places in Favorites the selected Roms
- Tag as Hidden (button): Hidden the selected Roms
- Tag as Normal (button): Normalizes the selected Roms (removes the Favorites and Hidden tags)
- Create M3U (button) : See Create .M3U files for multi-disc Roms
- Check name with MD5 (button): Check the correct name of the game on Screenscraper with its MD5
- Check Roms (button): Applies checkboxes 'Clean name', 'Add disk', 'Keep Rom name' and 'Add Country' for selected Roms
- Rom as game name (button): Renames the selected files with the name of the game. The checkboxes 'Clean name', 'Add disk', 'Keep Rom name' and 'Add Country' are also applied. Be careful when renaming .bin/.cue .iso/.cue .bin/.lst files, the contents of the text files (.cue /.lst) are not modified. Remember to modify it to agree with the new filename .bin/.iso.
- Update Core (button): For Arcade systems (FBA, MAME, Neogeo), assigns the best-suited emulator and core from the BestArcade4Recalbox file.
- Remove picture (button): Physically erases image files of selected Roms.
- Check if image exists ? (button): Check if the images shown in the database exist, otherwise delete references to these images in the Database
- Move to folder (button): Moves the selected Roms to another folder. If the destination folder is outside the parent folder, the ROM will be moved and removed from the current gamelist. If the destination folder is a root folder of a system, the gamelist of the destination folder will be updated.
- Recompose image (button): Applies the selected default template or the associated template (if 'Auto template' is checked) on the selected Roms using the images already retrieved using the screenshot, boxart, marquee, cartridge tags of the database. If a tag is missing and the 'ignore local search' option is not enabled, ARRM checks for missing images in the images directory.
- CRC32 (button): Calculates and stores the CRC32 in the <hash> tag for the selected Roms. Used for Netplay under Recalbox
- MD5 (button): Calculates the MD5 and stores in the <md5> tag for the selected Roms. The MD5 is calculated on the Roms file and not on the Rom contained in the .Zip or .7z file.
- . Zip (checkbox): By checking this box the calculation of the MD5 or CRC32 is done in priority on the file contained in the file .Zip / .7z
- Reset Core/Emu (button): Allows you to apply an emulator and a core from a list for the selected Roms.
- Delete METADATA (button): Removes the METADATA (gamelist info) and retains only the ROM filename and the game name extracted from the Rom file name.
- mamedb.org (button): Searches the selected Roms info on the MameDB.org site. This site only gives information about the games themselves. The info is quite succinct and it only returns a screenshot.
- TheGamesDB.net (button): Searches the selected Roms info on the TheGamesDb site. Prioritize the Screenscraper platform which is much more available and complete.
- Screenscraper (button): Searches the info of the selected Roms on the Screenscraper website. Prioritize this scraper which is complete and fast.
- (button): For each scraper (TheGamesDb.net and Screenscraper), allows to associate the system name on your Recalbox/Batocera with its identification on the Scrape website. the files are located in %appdata%\roaming\Nexouille Soft\arrm\database\systemes_screenscraper.txt and systemes_tgbd.txt. You can add other systems.
Example of the contents of the file ' systemes_screenscraper.txt ':
megadrive|1
genesis|1
mastersystem|2
nes|3
family_computer|3
snes|4
sfc|4
cps1|6
cps2|7
...
gba|12
gamecube|13
gc|13
n64|14
...
- Choose Mix Template (button): Allows you to choose from a list, the Template to apply when 'Mix' was chosen in 'Image Options'
- Auto template (checkbox): When scraping, allows to associate a template to a system thanks to the file %appdata%\roaming\Nexouille soft\arrm\database\template_association.txt, which you can edit by clicking the button.
'Choose Mix Model' screen
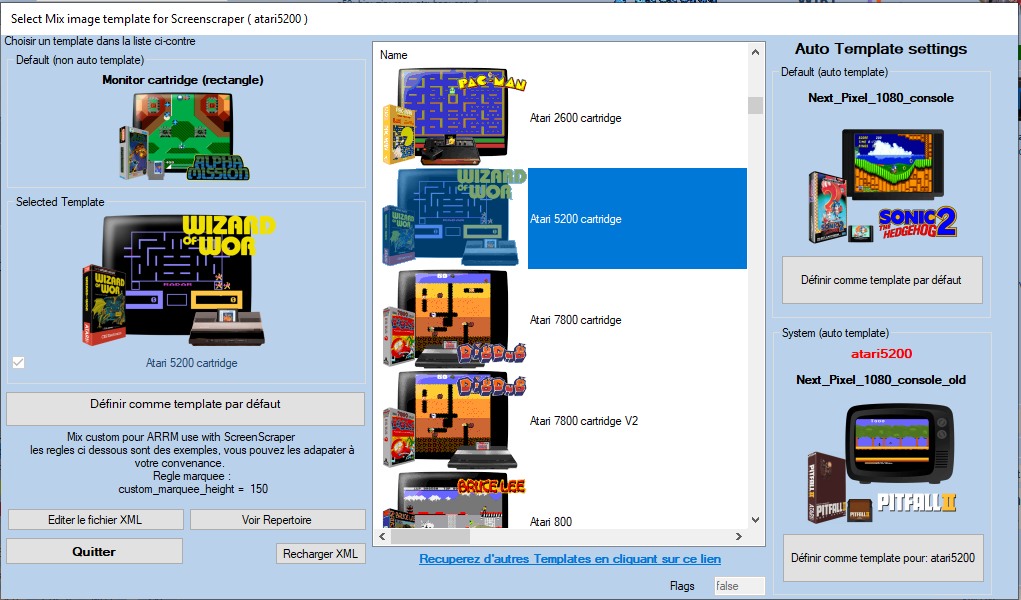
This screen allows you to choose the templates to use. Here you can configure three types of templates: Default (non auto template) , Default (auto template) , System (auto template)
On the left of the screen:
The Default (non auto template) panel indicates the default template that will be used for all scraped systems when the ' Auto template ' checkbox is not checked. To select it, you just have to choose a template from the list and check the button ' Define as default template ' located under the selected template.
On the right of the screen, in the section ' Auto Template Settings ':
The Default (auto template) panel indicates the default template that will be used for all scraped systems when the ' Auto template ' checkbox is checked. To select it, you just have to choose a template from the list and check the button ' Set as default template '.
The System (auto template) panel indicates the template that will be used for the selected system when the ' Auto template ' checkbox is checked. To select it, you just have to choose a template from the list and check the button ' Define as template for' system name ''.
These actions update the file %appdata%\roaming\Nexouille soft\arrm\database\template_association.txt
The button ' Edit XML file ' allows you to open the XML file of the selected template in your text file editor and modify it. See the section Create your own template for ARRM
The button ' See Directory ' opens the directory containing the .XML file and the associated image files.
The ' Exit ' button closes this screen and returns to the main screen.
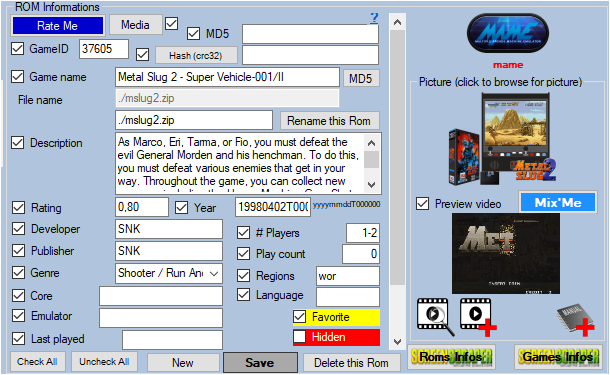
Detail / Modification of a Rom (5)
The Gamelist (6)
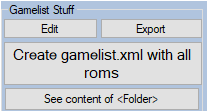
- Export as Hyperspin XML (checkbox): When saving the gamelist.xml, a Hyperspin compatible XML file containing the text information is also created.
- XML in uppercase (checkbox): When saving the gamelist.xml the fields Game name , Description , Developer , Publisher , Genre are capitalized.
Attention: to go back to lower case you will have to rewrite the textual information.
The Status Log (7)

The file 'scrape_log.txt' is positioned in the 'logs_arrm' subdirectory of the selected system.
Title screen
